Configuring Authorization with AWS SSO using Callback Drive for Amazon S3
Requirements: Callback Drive for Amazon S3
Introduction
Oftentimes, access and secret keys can be tedious to track, and if they need to be changed, then every spot that uses them also needs to be updated. IAM Identity Center is Amazon Web Services' solution to SSO, allowing users to manage their own environments without needing to have their own set of access and secret keys. IAM Identity Center also allows for any SAML-compliant external identity provider to be used instead of requiring separate accounts for employees.
Callback Drive for Amazon S3 supports IAM Identity Center through their OpenID Connect support. If using an external identity provider, then they will also need to support OIDC as well as SAML. Below is a simple guide for setting up IAM Identity Center, your environment, and Callback Drive for Amazon S3.
Contents
Setting up AWS SSO
First, you need to configure the IAM Identity Center within the relevant AWS account. This is the account that Callback Drive for Amazon S3 will authenticate as for your users. IAM Identity Center allows for AWS to be the Identity Provider but also allows for external Identity Providers like Microsoft Entra or Okta.
Identity Source
The first step is to confirm the identity source for your IAM Identity Center instance.
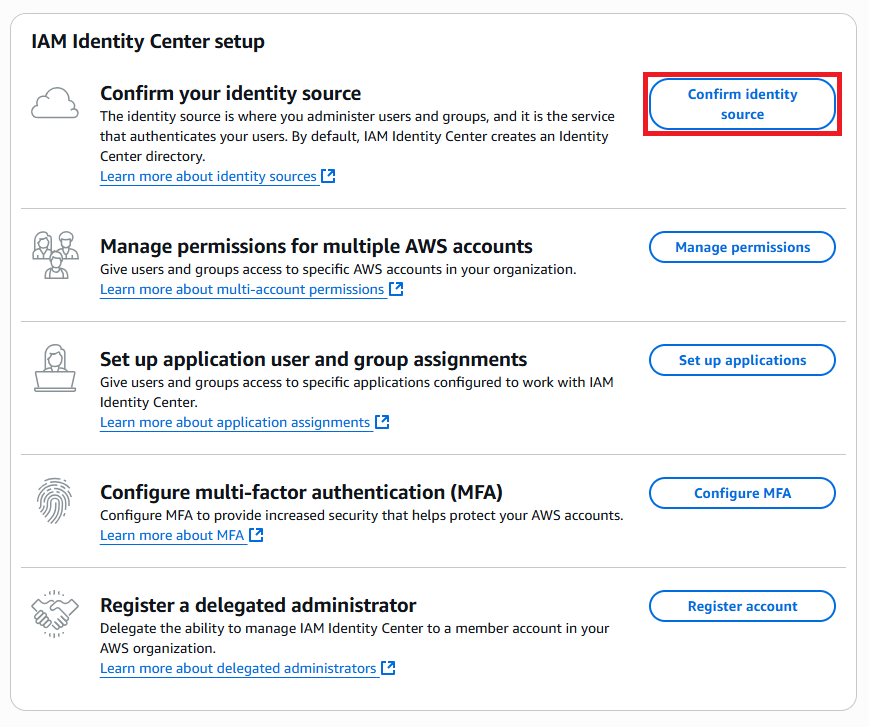
By default, the Identity Center directory is used, but IAM Identity Center allows for external identity providers like Microsoft Entra or Okta as well. Once on the identity tab in the settings, select the "Change identity source" option to configure the preferred identity source. This external identity provider needs to support OpenID Connect (OIDC) for Callback Drive for Amazon S3 to be able to get authorization.
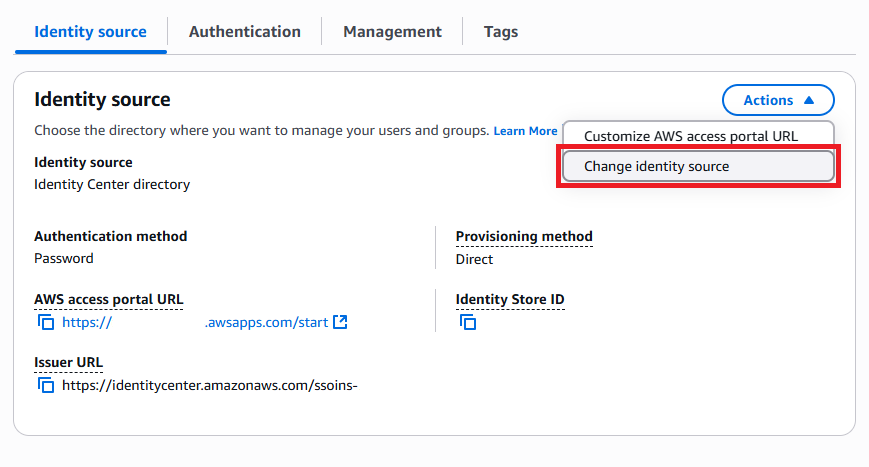
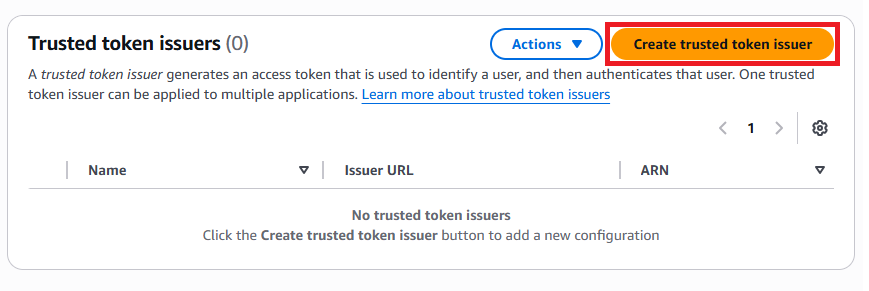
Additionally, if using an external identity provider, you will need to inform IAM Identity Center that it should trust the OIDC token that is generated. Within the same settings page that you used to register the identity source, you can switch the tab to the Authentication tab. At the bottom, you can select the "Create trusted token issuer" button to register the external identity provider as a trusted token issuer.
Users
Once finished, you will need to set up some users in the IAM Identity Center. Depending on your selected identity provider, there will need to be some specific fields so that the account created in IAM Identity Center matches the users in your external identity provider. The following examples use the default Identity Center directory.
First, navigate to the "Users" tab on the left-hand side and select "Add user" to begin the process. On this page, provide the information needed for your user. For example, we will create a user named S3 Drive that has the username s3drive-test.

AWS Account and Permission Sets
Users will need to be assigned to an AWS Account so that they can be assigned permissions. First, on the left menu select "AWS accounts". On this page, you will see the accounts for your organization. Select the account that the user should be assigned to. One selected, use the "Assign users or group" button.
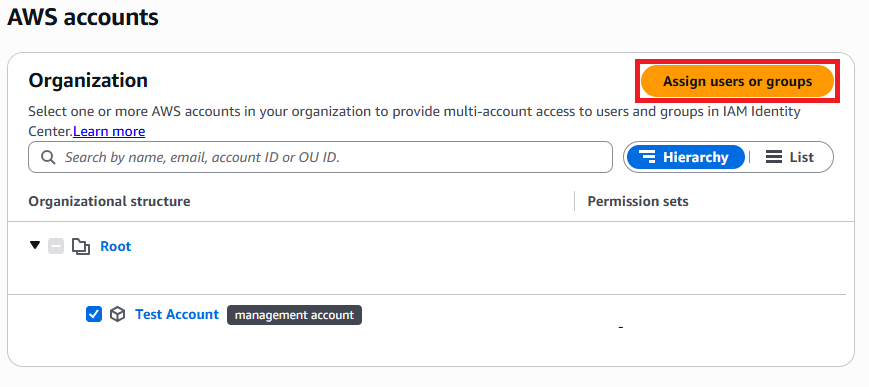
Find the user that you are looking to set up and select them. You can also select other users or groups during this time that will all have the same permissions.
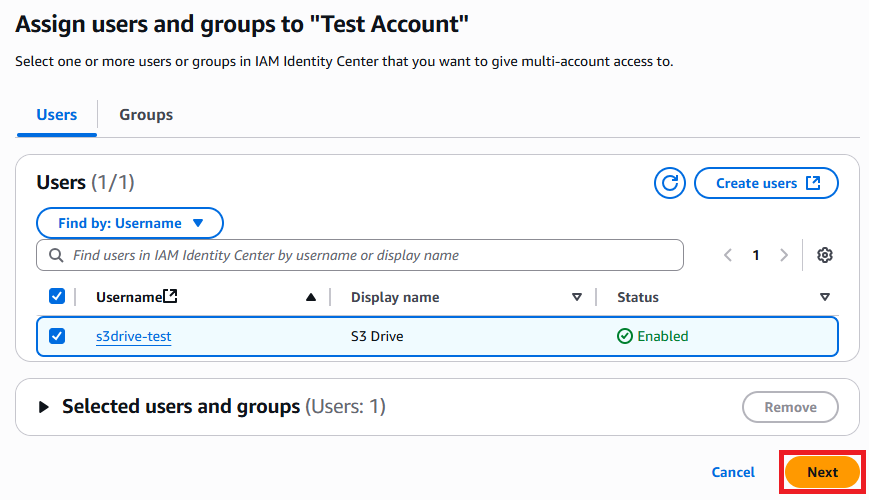
If you have not already created a permission set, make one that will allow the user access to the buckets that you would like Callback Drive for Amazon S3 to access. In the below example, we are making an administrator, so we use the predefined permission set.
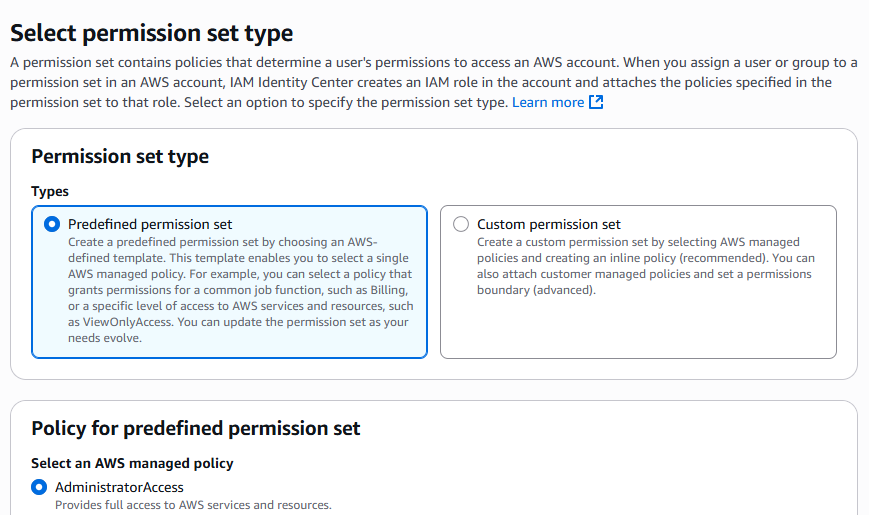
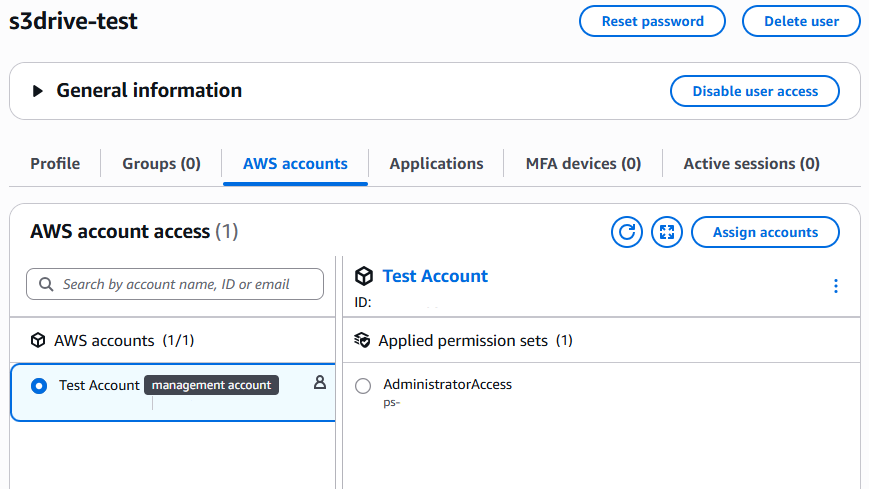
Select the permission set that you would like to use, then review the assignment and press submit. Once done, you can navigate back to your "Users" page and view the user. The "AWS accounts" tab should look like below.
IAM Identity Center has now been configured to allow a user to provide authorization for Callback Drive for Amazon S3 to access buckets that it has permissions to access!
Setting up the Environment
Callback Drive for Amazon S3 needs to get specific information for it to request authorization. First, you will need to get the following information from IAM Identity Center.
- Account ID [111111111111]
- SSO Start URL [https://d-2222222222.awsapps.com/start]
- Region [us-east-1]
- Permission set name [AdministratorAccess]
The account ID, permission set name, and region must match one that the user is assigned to. The SSO Start URL can be found on the IAM Identity Center dashboard under "AWS access portal URL."
Once the information is obtained, you can either use the AWS CLI by calling "aws configure sso" or set up a config file directly. The AWS CLI will typically create the configuration file in the "C:\Users\%user%.aws" directory, but the config file can be placed anywhere.
If using the AWS CLI, you will need to call "aws configure sso" then input the requested information. If manually creating the config file, the config file should contain a profile and sso-session that looks like the below text.
[profile example-sso-profile]
sso_session = example-sso-session
sso_account_id = 111111111111
sso_role_name = AdministratorAccess
region = us-east-1
output = json
[sso-session example-sso-session]
sso_start_url = https://d-2222222222.awsapps.com/start
sso_region = us-east-1
sso_registration_scopes = sso:account:access
Setting up Callback Drive for Amazon S3
To create a drive that uses IAM Identity Center to get authorization, you will need to create a new drive.
See Callback Drive for Amazon S3 Quickstart for more information.
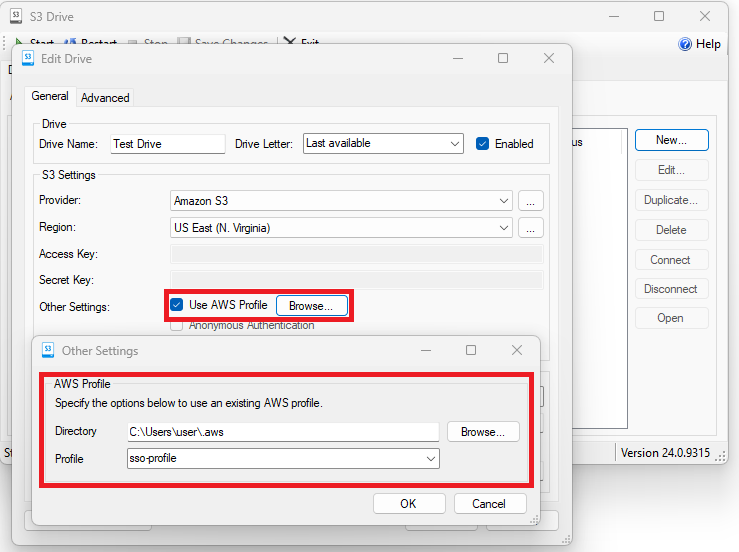
Instead of using an access key and secret key, check Use AWS Profile and click the Browse... button. On the "Other Settings" dialog page, navigate to the directory where your "config" file is found. By default, Callback Drive for Amazon S3 assumes it will be in the current user's ".aws" directory. Then select the profile with the matching profile name created above.
Once done, selecting OK will cause Callback Drive for Amazon S3 to go through the registration and authorization process with the user. The user will most likely be prompted to log in and provide consent. Once done, you can select a bucket and start the drive like normal. After some time, the SSO session will expire, and the user will need to log in and provide consent again.
We appreciate your feedback. If you have any questions, comments, or suggestions about this article please contact our support team at support@callback.com.